How to Create a New Entra ID Enterprise Application and Configure Custom Attributes for SAML Login for AWS Cognito
When integrating Entra ID (formerly Azure AD) with AWS Cognito for SAML login, it’s important to use a unique attribute to identify users. In this guide, we’ll walk you through the steps to create a new Enterprise Application in Entra ID and configure a custom attribute named user.objectid. This attribute ensures that user identities remain consistent even if other attributes, such as last names, change.
Why use user.objectid?
The user.objectid attribute is unique to each user in Entra ID and does not change, even if other user attributes are updated. This is particularly important for scenarios where an employee changes their last name, as other attributes will be updated with the new value. Using user.objectid prevents the creation of a new local user in your application and ensures that existing user data is preserved.
Steps to Create a New Enterprise Application in Entra ID
Create a New Application
- Navigate to the Azure Portal
- Open the Azure Portal and go to the Entra ID service.
- Create a New Application
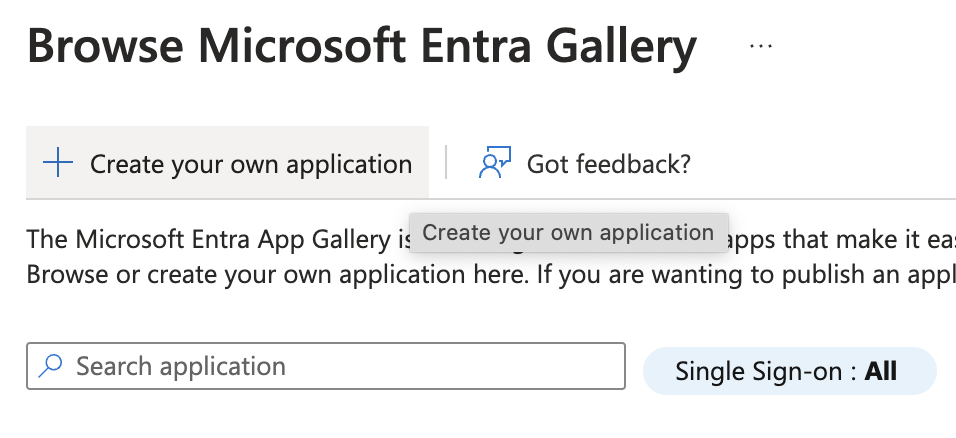
- Go to Enterprise applications and select New application.
- Choose Create your own application.
- Select the option to Integrate any other application you don’t find in the gallery (Non-gallery).
- Type the name of your new application and create it.
Configure Single Sign-On (SSO) login
Create the connection between Entra ID and your application by setting the login URL and the identity of your application.
- Select Single Sign-On Method
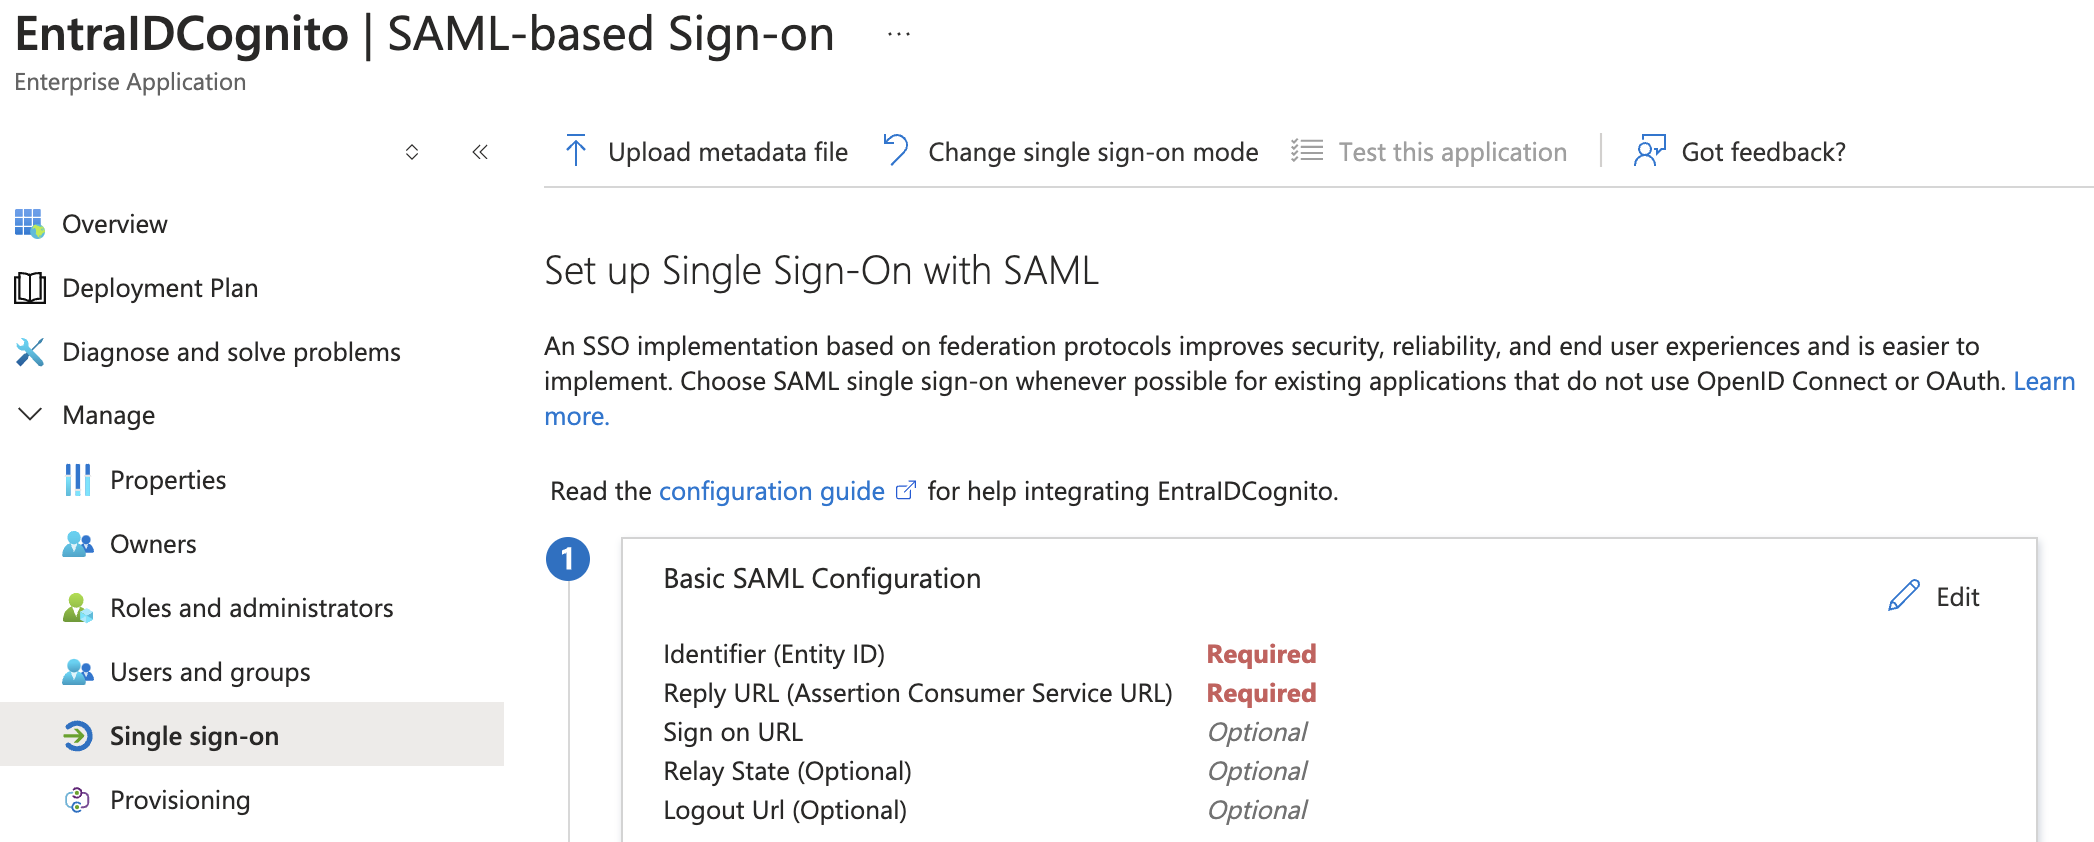
- In your Enterprise application, select the Single Sign-On option from the left menu.
- Click on SAML as the single sign-on method.
- Edit Basic SAML Configuration
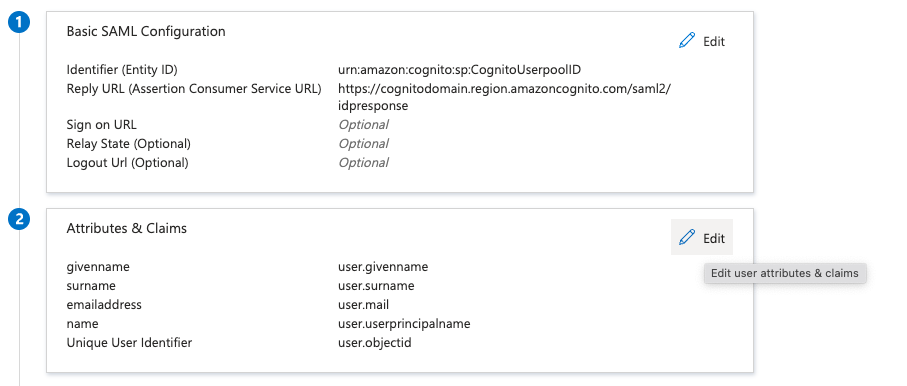
- Edit the Basic SAML Configuration.
- Add the Identifier (Entity ID) and Reply URL (Assertion Consumer Service URL).
- The Identifier (Entity ID) should follow the format: urn:amazon:cognito:sp:
cognito_userpool_id. - The Reply URL (Assertion Consumer Service URL) should follow the format: https://
cognito_domain_url/saml2/idpresponse. - Save the changes to the Basic SAML Configuration.
- The Identifier (Entity ID) should follow the format: urn:amazon:cognito:sp:
- Save the changes to the Basic SAML Configuration.
Configure the User Access for SSO login
Assign the users and groups that should have permissions to log in to your application.
- Assign Users and Groups
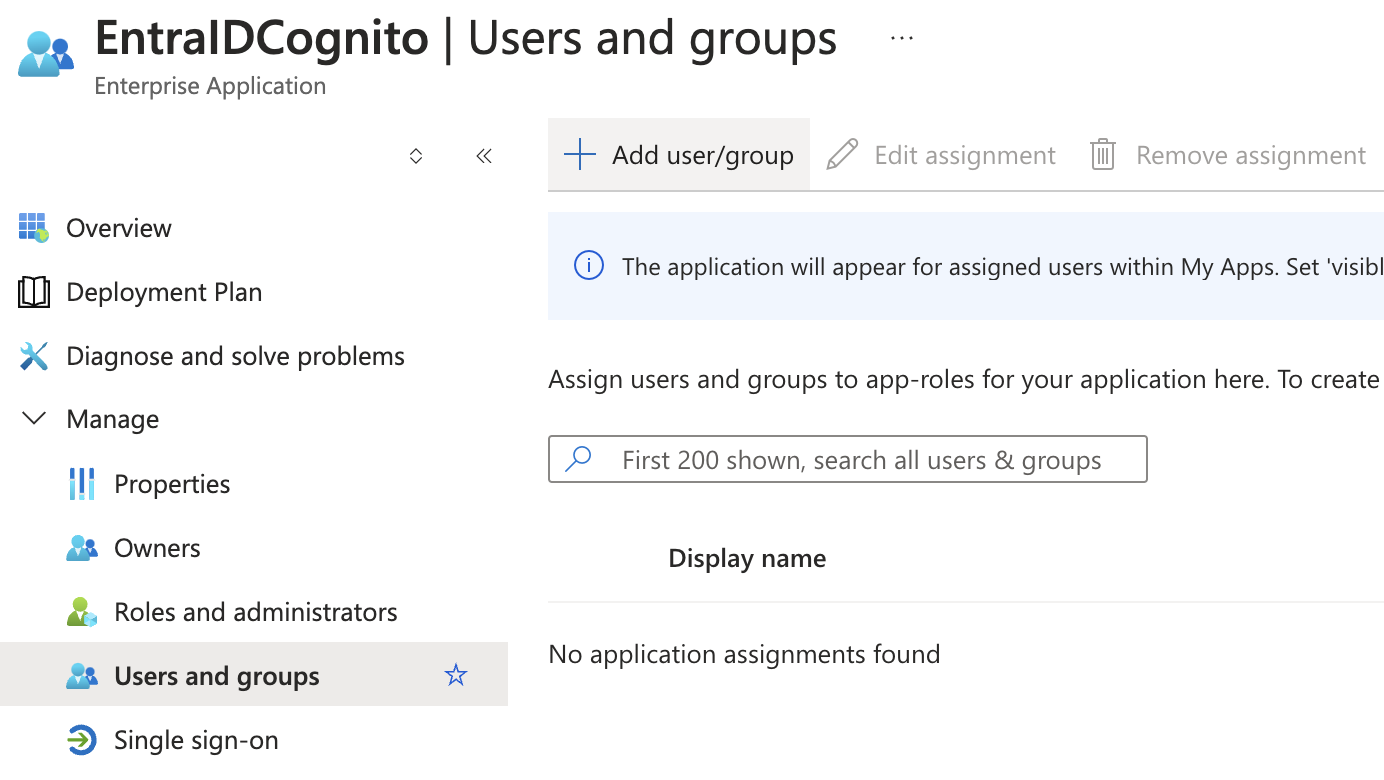
- Select the Users and groups option from the Enterprise application options.
- Click on Add user/group.
- Select the users and/or groups who should have access to your application.
- Confirm your selections and save.
Configure User Attributes & Claims for SSO Login
Configure which Entra ID attributes should be used to log in to your application.
- Edit User Attributes & Claims
- From the Single Sign-On option for your Enterprise application, edit the User Attributes & Claims.
- Set Unique User Identifier
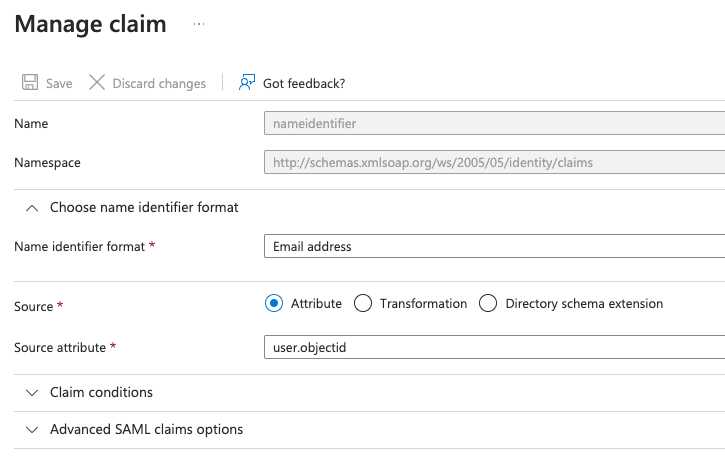
- Select the Unique User Identifier (Name ID) claim to edit it.
- In the Source attribute, set the value to
user.objectid. - Save the Changes
Update the AWS Cognito userpool
Once you have defined all the claim mappings on the Entra ID side, it is time to connect the dots on AWS’s side.
Retrieve SAML Federation Metadata
This is the intermediate step between configuring Entra ID and Cognito.
- Get the Federation Metadata URL
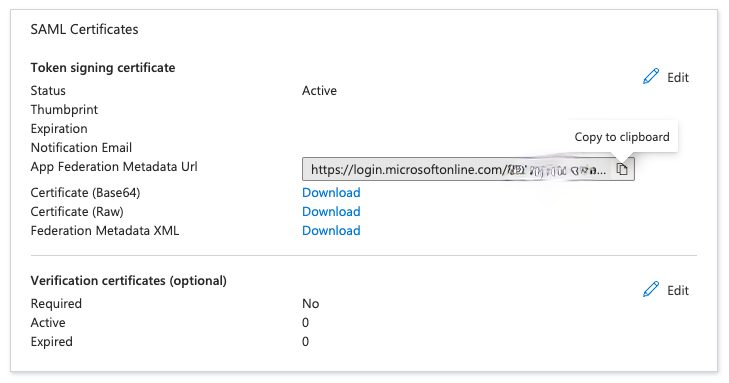
- In your Entra ID Enterprise application, navigate to the Single Sign-On section.
- Locate the App Federation Metadata Url.
- Copy this URL, as it will be needed in AWS Cognito.
Enable the IdP
After all configurations are done on Entra ID side, you need to update the configuration in Cognito.
- Enable the IdP
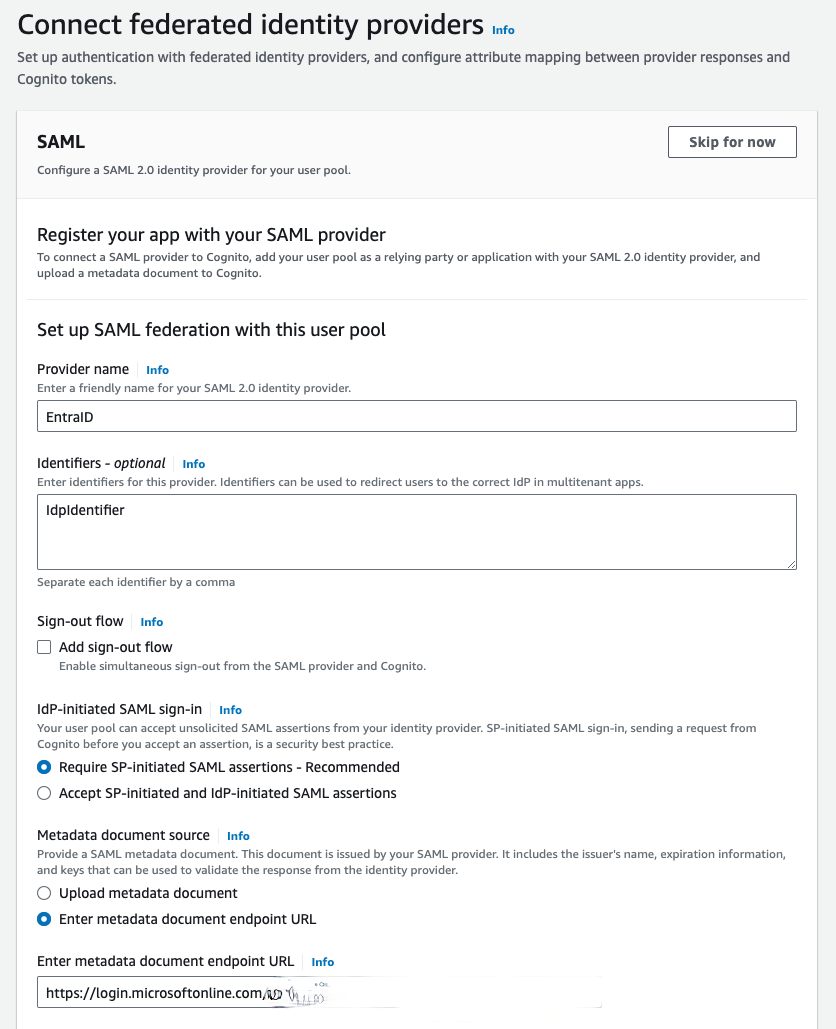
- In AWS Cognito, select the User Pool and go to the Sign-in experience tab.
- Under the Federated identity provider sign-in section, click on Add identity provider.
- Select the SAML type.
- Enter a name under Provider name.
- Under Identifiers, add the IdpIdentifier value.
- Use the recommended setting Require SP-initiated SAML assertions for the IdP-initiated SAML sign-in setting.
- Enter the metadata document endpoint URL saved previously.
This is a better solution than uploading the XML file because Cognito refreshes the metadata every 6 hours or before the metadata expires. This way, you don’t have to manually refresh the metadata XML every time the Entra ID SSL certificates expire or any other change occurs on the Entra ID side that would impact the federation authentication.
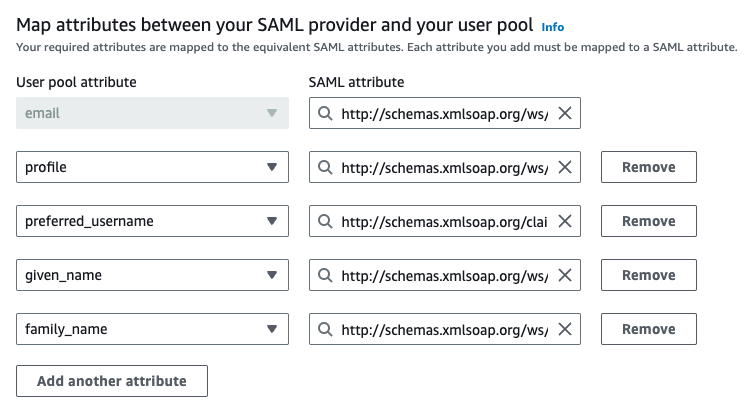
Configure Attribute Mapping
Configure the attributes that are stored in Entra ID and are mapped via the SAML schema in AWS Cognito. Here is a copy-and-paste friendly table for easier usage:
| SAML Attribute | User Pool Attribute |
|---|---|
| http://schemas.xmlsoap.org/ws/2005/05/identity/claims/upn | Profile |
| http://schemas.xmlsoap.org/claims/CommonName | Preferred User Name |
| http://schemas.xmlsoap.org/ws/2005/05/identity/claims/givenname | Given Name |
| http://schemas.xmlsoap.org/ws/2005/05/identity/claims/surname | Family Name |
| http://schemas.xmlsoap.org/ws/2005/05/identity/claims/emailaddress |
Enable the External IdP for App Clients
Now that you have an IdP using the Entra ID configuration, you need to assign it to your application created in the Cognito userpool.
- Enable the IdP for App Clients
- In AWS Cognito, navigate to the App integration tab, App client list section.
- Select the App client you want to configure and edit the Hosted UI section.
- From the Identity providers dropdown, select your newly created IdP (e.g., EntraID) and save the changes.
Test the Configuration
- Click on the View Hosted UI button to quickly test your changes
Final Steps
After a user has successfully authenticated via the external IdP, it will automatically be created in your Cognito userpool with the “Enabled” status. The confirmation status will be set to EXTERNAL_PROVIDER.
The user attribute identities will store the metadata relating to the external IdP that “owns” this identity. This includes the user’s ID in the external IdP’s attribute, in our case, the “Identifier (Entity ID)”.
These fields will be updated on each successful authentication, so you can rely on the fact that the fields you receive via JWT attributes will be up-to-date.
Conclusion
By following these steps, you will have a fully functioning solution offering federated authentication with an external Entra ID. This setup ensures that user identities remain consistent and up-to-date, even when user attributes change.
