What is this about?
This is a blog-post about a proof-of-concept project I have worked on together with my colleague Robert Fitch to find out what it takes to access on-premise data from an internet client. Robert has created the server side API (you can read about it in part 1) and my role was to create a mobile app which consumes the methods exposed by this API. The technologies used in order to create the app were HTML5, AngularJS, Bootstrap css and Apache Cordova.
Why Apache Cordova?
Apache Cordova targets multiple platforms with one code base(html, css and javascript) and it is open source. There are many pros and cons using this stack of technology. We needed to address the app to a wide range of users with as little effort as possible. That is why we didn’t use a pure native approach. For the POC app we have targeted Android and iOS devices as potential consumers.
What else do we need beside Apache Cordova?
Apache Cordova is offering a good way to organize your project. It assures OS specific customizations and the OS specific mobile app builds(the .apk for Android and .ipa for iOS). Apache Cordova being set up once is very little modified during the lifetime of the project. For the effective development we have used AngularJS and Bootstrap.css.
It is worth mentioning that when I have started to work on this project I had no experience with the above mentioned technologies: neither Apache Cordova , nor AngularJS or Bootstrap.css. I am a pretty experienced web developer who have worked before mainly on jquery based projects. Starting to learn about AngularJS I have discovered a new way of thinking about web development, more precisely how to develop a web application avoiding the use of jquery. The main idea using AngularJS was to create dynamic views driven by javascript controllers. AngularJS lets you extend HTML with your own directives , the result being a very expressive, readable and quick to develop environment.
In my day by day job I mostly use Microsoft technologies like C#. I do this using Visual Studio as an IDE. That is why a good choice to set up this project was to use Visual Studio Tools for Apache Cordova. By the time I have started to work on the project the Update 2 of these tools were available, now after a couple of months Update 7 can be downloaded with a lot of improvements.

This being installed you have what you need to start the work. It installs Android SDK and a lot of other dependent stuff you might need during development. I will not detail this since this has been done before by others. If you want to read about you have a lot of resources available like : http://taco.visualstudio.com/en-us/docs/get-started-first-mobile-app/
Front-End requirements
In a few words we needed:
- a login page
- a list of trips
- the possibility to create/edit a trip
- add/edit/delete receipts assigned to a trip
- the receipts form needed visibility rules of some fields(depending on a category)
The project
Knowing the above here is a screenshot of how I ended up structuring the project:
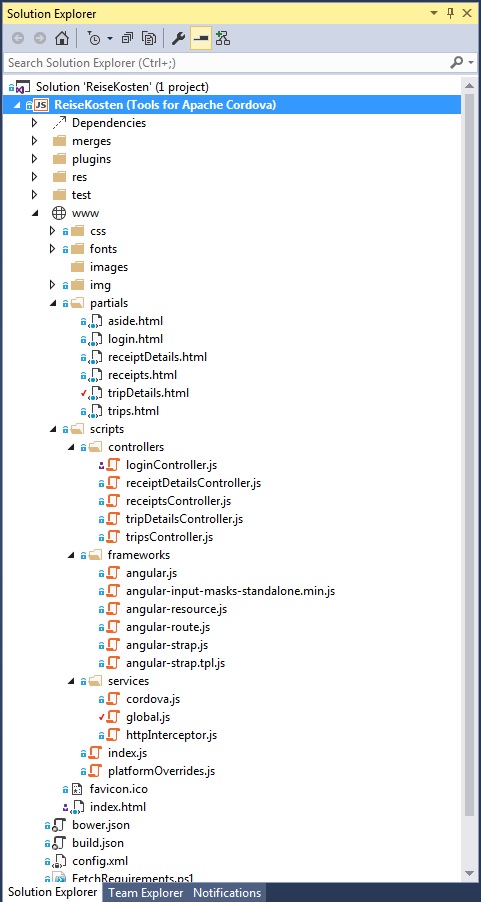
In the upper part of the solution we can see the some folders created by Visual Studio project structure where OS specific things are kept. For instance merges folder has android and ios subfolders each of them containing a css folder where resides a file called overrides.css. Of course these files have different content depending on the OS. What is cool with this, is that at build time Visual Studio places the corresponding override in each OS specific build(in the .apk or the .ipa in our case).
The plugins folder is nice too , here will reside the plugins which helps to extend the web application with native app abilities. For instance we can install here a plugin which will be able to access the device camera.
The res folder contains OS specific icons (e.g. rounded icons for IOS and square icons for Android) and screens. Finally in the upper part of the solution there is a test folder where the unit and integration tests will reside.
The next folder www contains the project itself, the common code base. We see here a bunch of files which are nicely and clearly organized, maybe not for you yet, but hopefully things become more clear with the next code snippet of the index.html which is the core of the SPA and where the whole app is running:
<!doctype html>
<html ng-app="travelExpensesApp" ng-csp>
<head>
    <meta charset="utf-8" />
    <meta name="viewport" content="width=device-width, initial-scale=1.0, minimum-scale=1.0, maximum-scale=1.0, user-scalable=no">
    <meta name="format-detection" content="email=no">
    <meta name="format-detection" content="telephone=no">
    <link href="css/bootstrap.css" rel="stylesheet">
    <link href="css/bootstrap-additions.css" rel="stylesheet" />
    <link href="css/index.css" rel="stylesheet"/>

    <!-- Cordova reference, this is added to the app when it's built. -->
    <link href="css/overrides.css" rel="stylesheet"/>

    <!-- Angular JS -->
    <script src="scripts/frameworks/angular.js"></script>
    <script src="scripts/frameworks/angular-resource.js"></script>
    <script src="scripts/frameworks/angular-route.js"></script>
    <script src="scripts/frameworks/angular-strap.js"></script>
    <script src="scripts/frameworks/angular-strap.tpl.js"></script>
    <script src="scripts/frameworks/angular-input-masks-standalone.min.js"></script>

    <!-- Cordova reference, this is added to the app when it's built. -->
    <script src="cordova.js"></script>
    <script src="scripts/platformOverrides.js"></script>

    <!-- Initialize all the modules -->
    <script src="scripts/index.js"></script>

    <!-- Services -->
    <script src="scripts/services/cordova.js"></script>
    <script src="scripts/services/global.js"></script>
    <script src="scripts/services/httpInterceptor.js"></script>

    <!-- Controllers -->
    <script src="scripts/controllers/loginController.js"></script>
    <script src="scripts/controllers/tripsController.js"></script>
    <script src="scripts/controllers/tripDetailsController.js"></script>
    <script src="scripts/controllers/receiptsController.js"></script>
    <script src="scripts/controllers/receiptDetailsController.js"></script>
</head>
<body >
    <div ng-view></div>
</body>
</html>
Being a SPA everything runs in one place. All the necessary files are included in the header : first the app specific css files, then the css override file which is replaced with OS specific one at build time. Next are included the AngularJS and AnfularJS specific libraries and then comes the platform specific javascript overrides. Until now we have included only libraries and overrides, what comes from now is the base of the app the index.js.
A code snippet from here helps to understand the AngularJS application:
(function () {
    "use strict";

    var travelExpensesApp = angular.module("travelExpensesApp", ["ngRoute", "mgcrea.ngStrap", "ui.utils.masks", "travelExpensesControllers", "travelExpensesApp.services"]);
    angular.module("travelExpensesControllers", []);
    angular.module("travelExpensesApp.services", ["ngResource"]);

    travelExpensesApp.config([
        "$routeProvider",
        function($routeProvider) {
            $routeProvider.
                when("/", {
                    templateUrl: "partials/login.html",
                    controller: "LoginControl"
                }).
                when("/companies/:companyId/employees/:employeeId/trips", {
                    templateUrl: "partials/trips.html",
                    controller: "TripsControl"
                }).
                when("/companies/:companyId/employees/:employeeId/trips/:tripId", {
                    templateUrl: "partials/tripDetails.html",
                    controller: "TripDetailsControl"
                }).
                when("/companies/:companyId/employees/:employeeId/trips/:tripId/receipts/:receiptId", {
                    templateUrl: "partials/receiptDetails.html",
                    controller: "ReceiptDetailsControl"
                }).
                otherwise({
                    redirectTo: "/"
                });
        }
    ]);
The AngularJS application is organized using modules. We can think of modules as containers for controllers , services, directives, etc. These modules are reusable and testable. What we can see above is that I have declared an application level module (travelExpensesApp) which depends on other modules .
I have created a separate module for controllers(travelExpensesControllers) and one for services(travelExpensesApp.services). I have also used some libraries as modules like : ngRoute (from angular-route.js), mgCrea.ngStrap (from angular-strap.js) and ui.utils.masks (from angular-input-masks-standalone.min.js). The module declarations links everything together and creates the base of the app.
Beside modules the above code snippet contains the configuration of routing. Using ngRoute lets us use routing which helps us a lot to define a nice and clear structure for the frontend app. AngularJS routing permits a good separation of concerns. GUI resides in html templates defined by the templateUrls and the logic behind is separated in the controller javascript files.
To understand a bit better let’s take a look on the trips page which is built up from trips.html as template and TripsControl as controller:
<div class="navbar navbar-inverse">
    <div class="navbar-header pull-left">
        <button type="button" class="btn-lx-hamburger navbar-toggle pull-left" data-toggle="collapse" data-target="#myNavbar" bs-aside="aside" data-template-url="partials/aside.html" data-placement="left" data-animation="am-slide-left" data-container="body">
            <span class="icon-bar"></span>
            <span class="icon-bar"></span>
            <span class="icon-bar"></span>
        </button>
        <a class="navbar-brand padding-rl10">
            <span class="glyphicon glyphicon-user"></span> {{employeeData.first_name}} {{employeeData.last_name}}
        </a>
    </div>
    <div class="navbar-header pull-right">
        <a class="navbar-brand" ng-disabled="true" ng-click="newTravel()"><span class="glyphicon glyphicon-plus"></span></a>
    </div>
</div>
<div class="container">
    <div waithttp ng-show="!waitingHttp">
        <div class="table-responsive">
            <table class="table table-striped">
                <thead>
                <tr>
                    <th>Datum</th>
                    <th>Von</th>
                    <th>Nach</th>
                </tr>
                </thead>
                <tbody>
                <tr ng-repeat="trip in trips | orderBy : departure_date : reverse" ng-click="editTravel(trip.id)">
                    <td>
                        {{trip.departure_date | date : 'dd.MM.yyyy'}}
                    </td>
                    <td>
                        {{trip.departure}}
                    </td>
                    <td>
                        {{trip.destination}}
                    </td>
                </tr>
                </tbody>
            </table>
        </div>
    </div>
</div>
The above html contains a navbar and a simple list of trips. What we notice from the start are the double curly braces (e.g. ‘{{ trip.departure }}’) and directives starting with “ng” prefix. These are the main ways how the template interacts with the controller :
(function () {
    "use strict";

    angular.module("travelExpensesControllers").controller("TripsControl", ["$scope", "$http", "$routeParams", "$location","global", TripsControl]);

    function TripsControl($scope, $http, $routeParams, $location, global) {
        $scope.companyId = $routeParams.companyId;
        $scope.employeeId = $routeParams.employeeId;
        $scope.employeeData = global.user.employeeData;
        $scope.aside = {
            "title" : global.user.employeeData.first_name + " " + global.user.employeeData.last_name
        };

        var tripsRequest = {
            method  : "GET",
            url     : global.baseUrl + "companies/" + $scope.companyId + "/employees/" + $scope.employeeId + "/trips",
            headers : {
                "Content-Type": "application/hal+json",
                "Session-Id": global.sessionId
            }
        };

        $http(tripsRequest).then(
            function (data) {
                $scope.trips = data.data.ResourceList;
            },
            function (data) {
                $scope.error = data;
                // session probably bad, go back to login page
                $location.path("/");
            });


        $scope.newTravel = function () {
            delete global.tripDetails;
            var url = "/companies/" + global.user.companyData.id + "/employees/" + global.user.employeeData.id + "/trips/0";
            $location.url(url);
        }


        $scope.editTravel = function (travelId) {
            var url = "/companies/" + global.user.companyData.id + "/employees/" + global.user.employeeData.id + "/trips/" + travelId;
            $location.url(url);
        }

        $scope.doLogout = function () {
            $location.path("/").search({invalidate: true});
        }
    }
})();
Above we can see how the TripsControl is defined . To expose something usable in the template we just exetend/add a new property or function to the $scope variable. For example we get the list of trips if we have a successful answer for a $http request defined by js var tripsRequest.
In a nutshell the above should give you an idea how angular works and used in this POC.
What else ?
Since the most of the time during this POC I have worked with AngularJS you might wondering if I had to implement something else which is worth mentioning?
Yes, for example implementing hardware back button support for Android devices was pretty interesting and challenging . In order to achieve this I needed to create an angular service where I had to use Cordova capabilities. The result looks like this :
(function () {
    "use strict";

    angular.module("travelExpensesApp.services").factory("cordova", ["$q", "$window", "$timeout", cordova]);

    /**
	 * Service that allows access to Cordova when it is ready.
	 *
	 * @param {!angular.Service} $q
	 * @param {!angular.Service} $window
	 * @param {!angular.Service} $timeout
	 */
    function cordova($q, $window, $timeout) {
        var deferred = $q.defer();
        var resolved = false;

        // Listen to the 'deviceready' event to resolve Cordova.
        // This is when Cordova plugins can be used.
        document.addEventListener("deviceready", function () {
            resolved = true;
            deferred.resolve($window.cordova);
            console.log("deviceready fired");
        }, false);

        // If the 'deviceready' event didn't fire after a delay, continue.
        $timeout(function () {
            if (!resolved && $window.cordova) {
                deferred.resolve($window.cordova);
            }
        }, 1000);

        return {

            ready: deferred.promise,
            platformId: cordova.platformId,
            eventHandlers:[],
            backAction: function (callback) {
                if (typeof (callback) === "function") {
                    var callbackAction;
                    var removeCallbackAction = function () {
                        document.removeEventListener("backbutton", callbackAction);
                    }
                    callbackAction = function () {
                        callback();
                        removeCallbackAction();
                    }
                    // remove previously added event handler if it didn't removed itself already
                    // this can happen when a navigating deeper than 1 level for example :
                    // 1. trips - > tripDetails :: back action is added
                    // 2. tripDetails -> receiptDetials :: back action from step 1 removed , current action is added
                    if (this.eventHandlers.length > 0) {
                        document.removeEventListener("backbutton", this.eventHandlers[0]);
                        this.eventHandlers.splice(0,1);
                    }
                    document.addEventListener("backbutton", callbackAction, false);
                    this.eventHandlers.push(callbackAction);
                }
            }
        };
    }
})();
The above is not the simplest code, it might be improved, but for the POC it did a great job.
Other interesting thing worth to mention is that testing is pretty easy and straightforward using this stack.I will not detail this but it is worth to know that in one day I have managed to set up the environment and write some unit tests for the receiptDetailsController.js using karma.js and one more day took to set up the environment and create some end to end tests using protractor.js.
Overall this stack of technologies allowed to put a healthy and solid base for a prjoect which in the future can become a complex mobile app. Development was quick and resulted a nice POC app out of it. Is this stack a good choice for future mobile apps? At this moment I think that it is. Let’s see what the future will bring to us :).