This article shows you how to develop an ASP.NET application to:
- Log in with an on-premise ADFS Identity
- Check whether the user belongs to a given group (for example, a certain mailing list)
Prepare the Project
Create
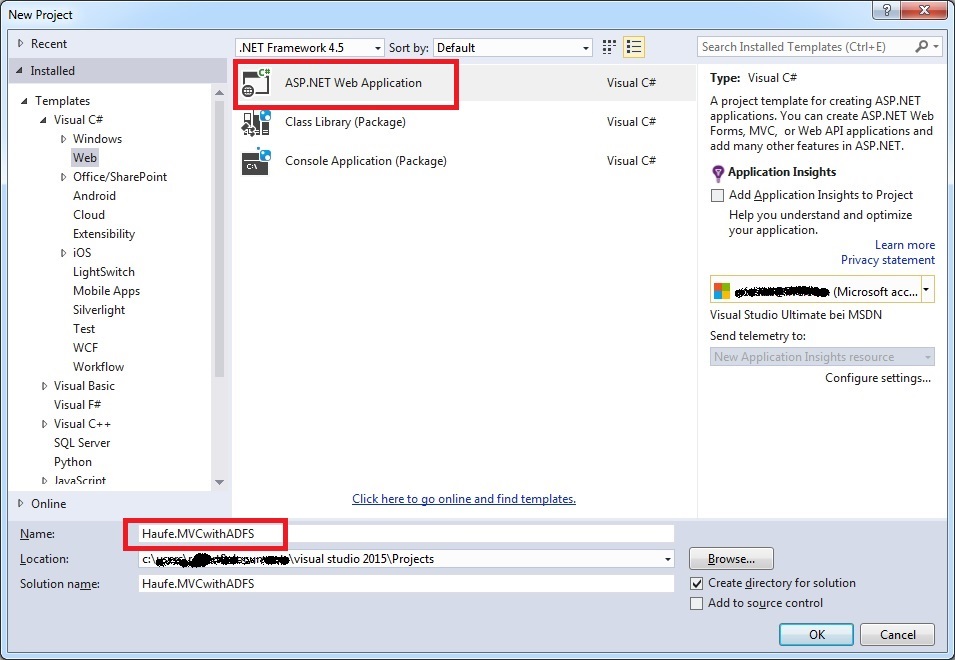
Create a new ASP.NET Web Application, for example:
On the next page, select MVC, then click on “Change Authentication”:
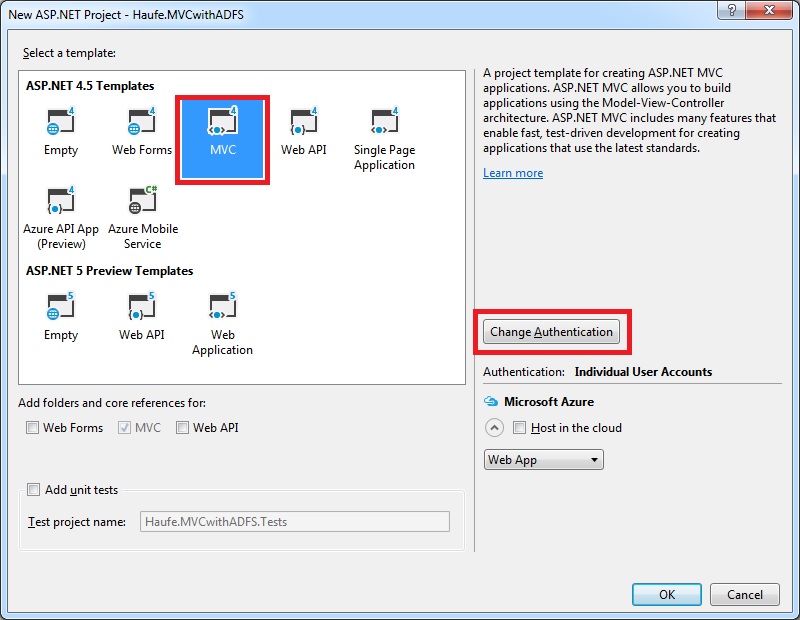
You will be sent to this dialog:
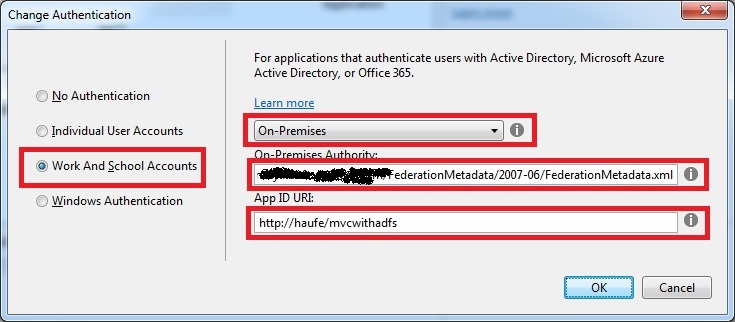
- Select Work and School Accounts
- Select On-Premises
-
For the On-Premises Authority, ask IT for the public URL of your FederationMetadata.xml on the identity server, e.g.
https://xxxxxxxxxx.com/FederationMetadata/2007-06/FederationMetadata.xml - For the App ID URI, you must enter an identifier for your app. This is not a real URL address, just a unique identifier, for example
http://haufe/mvcwithadfs.
Important: The App ID URI identifies your app with the on-premise ADFS identity server. This same App ID must be registered on the ADFS identity server by IT as a Relying Party Trust identifier (sometimes known as Realm), so that the server will accept requests.
Finish up the project creation process.
Edit some Settings
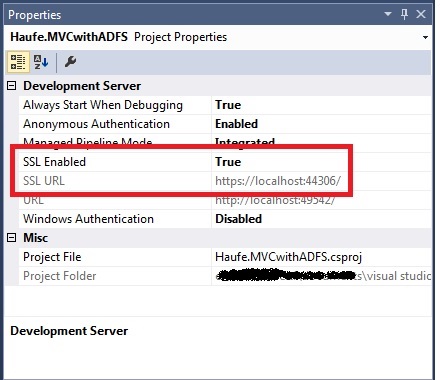
Make sure that the project is set to run as HTTPS:
Compile the project.
The authentication code
If you are wondering where all of the authentication code resides (or if you need to modify an existing project!), here are the details:
The App ID URI and the On-Premises Authority URL are stored in the <appSettings> node of web.config:
<add key="ida:ADFSMetadata" value="https://xxxxxxxxxx.com/FederationMetadata/2007-06/FederationMetadata.xml" />
<add key="ida:Wtrealm" value="http://haufe/mvcwithadfs" />
And the OWIN-Code to specify the on-premise authentication is in Startup.Auth.cs:
public partial class Startup
{
    private static string realm = ConfigurationManager.AppSettings["ida:Wtrealm"];
    private static string adfsMetadata = ConfigurationManager.AppSettings["ida:ADFSMetadata"];

    public void ConfigureAuth(IAppBuilder app)
    {
        app.SetDefaultSignInAsAuthenticationType(CookieAuthenticationDefaults.AuthenticationType);
	    app.UseCookieAuthentication(new CookieAuthenticationOptions());
	    app.UseWsFederationAuthentication(
	        new WsFederationAuthenticationOptions
	            {
	                Wtrealm = realm,
	                MetadataAddress = adfsMetadata
	            });
    }
}
Configure the On-Premise Identity Server (Job for IT)
On the identity server, these are the critical configuration pages for a new Relying Party Trust.
Identifiers
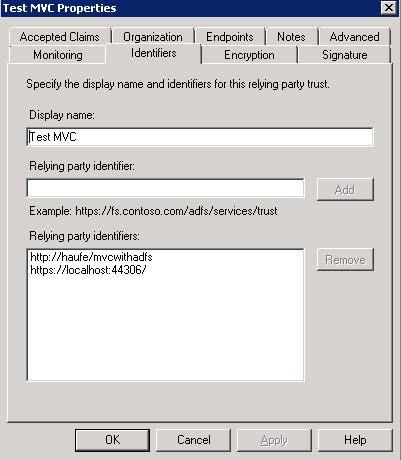
Display Name: This is the name under which IT sees the Relying Party Trust.
Relying Party identifiers: This is a list of relying party identifiers, known on “our” ASP.NET side as App ID URI. The only important one is the App ID URI we assigned to our app when creating it. On this screen, you also see https://localhost:44306. This was automatically set by the Relying Party Trust Wizard when it asked for the first endpoint, since it assumed that the endpoint is also a default identifier. But since we specified a custom App ID URI (which gets transmitted by the user’s browser), the http://haufe/mvcwithadfs entry is the only one which really matters.
Endpoints
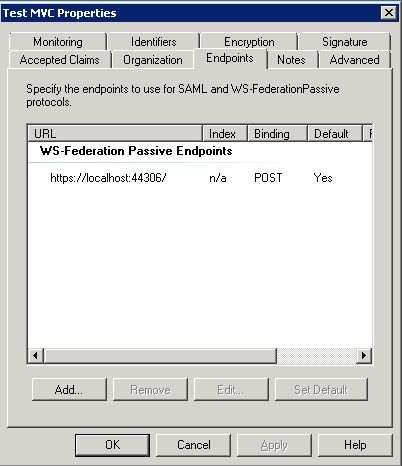
This is the page which lists all browser source endpoints which are to be considered valid by the identity server. Here you see the entry which comes into play while we are debugging locally. Once your application has been uploaded to server, e.g. Azure, you must add the new endpoint e.g.:
https://xxxxxxxxxx.azurewebsites.net/
(not shown in the screen shot)
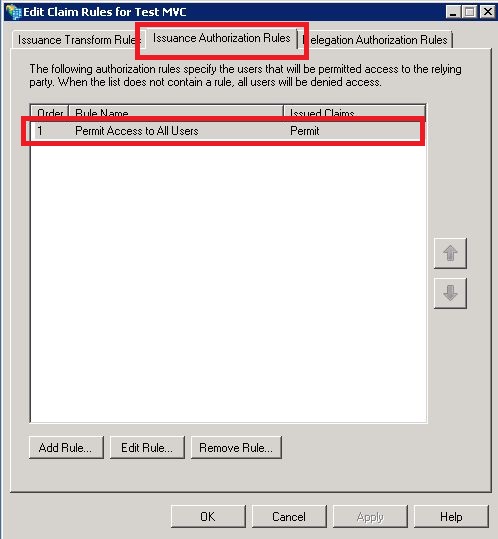
Claim Rules
Issuance Authorization Rules
Issuance Transform Rules
This is where we define which identity claims will go out to the requesting application.
Add a rule named e.g. AD2OutgoingClaims
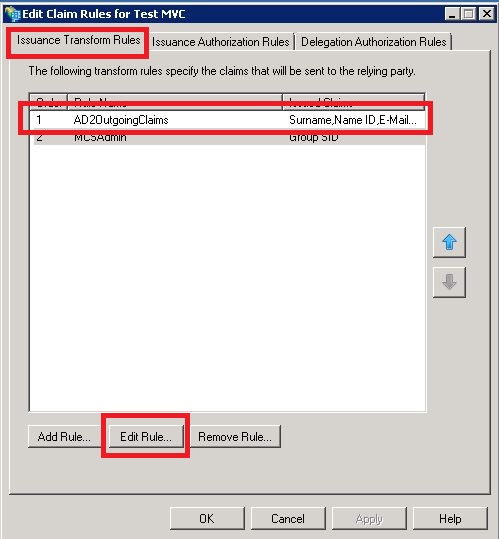
and edit it like this:
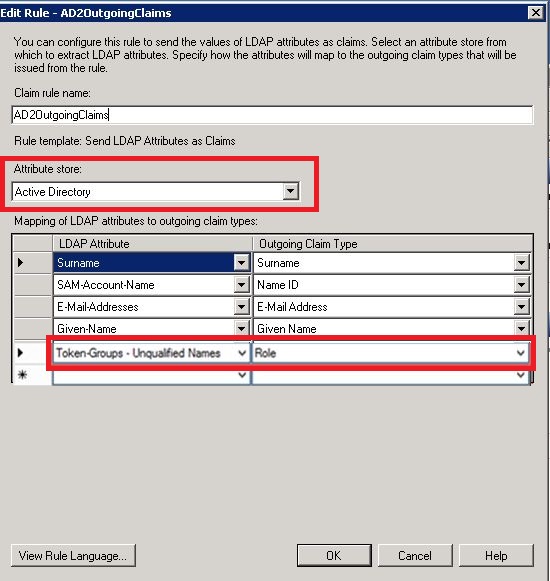
The last line is the special one (the others being fairly standard). The last line causes AD to export every group that the user belongs to as a role, which can then be queried on the application side.
Run
At this point, the app can be compiled and will run. You can log in (or you might be automatically logged in if you are running from a browser in the your company’s domain).
Check Membership in a certain Group
Because we have configured the outgoing claims to include a role for every group that the user belongs to, we can now check membership. We may, for example, want to limit a given functionality to members of a certain group.
Create an Authorizing Controller
You may create a controller with the Authorize attribute like this:
[Authorize]
public class RoleController : Controller
{
}
The Authorize attribute forces the user to be logged in before any requests are routed to this controller. The log in dialog will be opened automatically if necessary.
It is also possible to use the Authorize attribute not on the entire controller, but just on those methods which need authorization.
Once inside a controller (or method) requiring authorization, you have access to the security Information of the user. In particular, you can check membership in a given role (group) like this:
if (User.IsInRole("_Architects")
{
    // do something
}
else
{
    // do something else
}
Within a cshtml file, you may also want to react to user membership in a certain role. One way to do this is to bind the cshtml file to a model class which contains the necessary boolean flags. Set those flags in the controller, e.g.:
model.IsArchitect = User.IsInRole("_Architects");
Pass the model instance to the view, then evaluate those flags in the cshtml file:
@if (Model.IsArchitect)
{
    <div style="color:#00ff00">
        <text><b>Yes, you are in the Architect group.</b></text>
    </div>
}
else
{
    <div style="color:#ff0000">
        <text><b>No, you are not in the Architect group.</b></text>
    </div>
}
Instead of using flags within the data binding model, it may be easier to have the controller just assign a property to the ViewBag and evaluate the ViewBag in the cshtml file.