Documentation as code
Technical documentation, if done at all, often tends to get outdated very quickly. One of the reasons for that often lies in having the documentation located somewhere far away from the subject it is documenting: the code.
The guys who are supposed to write the documentation face a media break when going to document what they were doing: They need to update a document which is not co-located to the code they were writing and perhaps even is not available in their IDE (e.g., a wiki or a word document somewhere in Sharepoint).
Even if that burden is taken and the documentation gets updated, it may contain duplicated content when it comes to code examples.
Having code examples in the documentation quickly violates the single source of truth. If the corresponding code changes, how am I sure that the documentation does not get outdated or even misleading at worst?
This Blog Post describes how we try to tackle this using Documentation as Code based on AsciiDoc.
AsciiDoc
AsciiDoc is a lightweight markup language, which is meant for writing technical documentation, articles or even presentations, books or prose.
It started as an alternative to DocBook, which is XML based and thus brings much more markup overhead.
While being lightweight, it is expressive enough for writing the mentioned types of documents. That distinguishes AsciiDoc from other lightweight markup languages like e.g. Markdown (see e.g. Don’t use markdown for technical docs, AsciiDoc vs. Markdown).
Here are some of the things you can easily express in AsciiDoc:
Code blocks with syntax highlighting and callouts
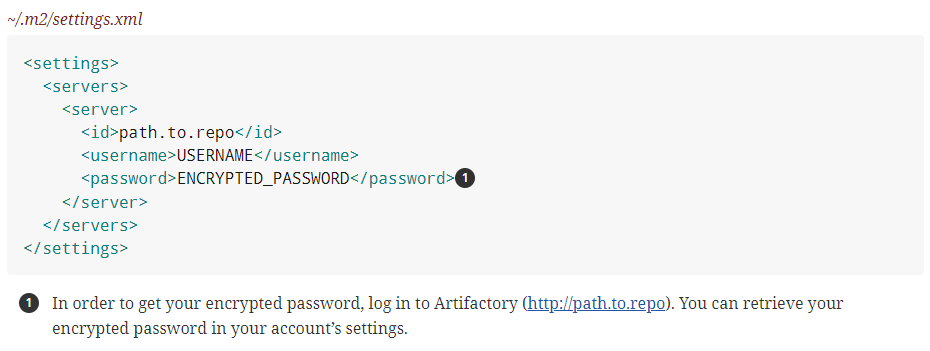
There are source highlighters available for multiple languages. Here is an example for XML. The source also contains a so called callout, which is used to mark a specific position in the code, that can be referenced below the code block for further explanation:
[source,xml]
.~/.m2/settings.xml
----
<settings>
  <servers>
    <server>
      <id>path.to.repo</id>
      <username>USERNAME</username>
      <password>ENCRYPTED_PASSWORD</password><!--1-->
    </server>
  </servers>
</settings>
----
<1> In order to get your encrypted password, log in to Artifactory (http://path.to.repo). You can retrieve your encrypted password in your account's settings.
The result looks like this:

Info-, warning- and further blocks
It is also very easy to emphasize different sections, e.g. for prominently placing a hint, a warning or an excursion:
TIP: Delimited block, showing a general tip.

IMPORTANT: Delimited block, showing an important information.

WARNING: Delimited block, showing a warning.

.Some excursion
****
Lorem ipsum dolor sit amet, consectetuer adipiscing elit. Aenean commodo ligula eget dolor. Aenean massa. Cum sociis natoque penatibus et magnis dis parturient montes, nascetur ridiculus mus. Donec quam felis, ultricies nec, pellentesque eu, pretium quis, sem. Nulla consequat massa quis enim
****
This gets rendered to:

Tables
Tables can be easily created in various ways. One way is to use inline CSV format like this
[%header,format=csv]
|===
Author,Title,Year
Michael C. Feathers,Working Effectively with Legacy Code,2004
Robert C. Martin,Clean Code,2008
Joshua Bloch,Effective Java,2017
|===
which gets rendered to

AsciiDoc could also render that table directly from a CSV file from disk. That can be useful if you, for instance, want to include content of dynamically created CSV files (e.g. some kind of report done within the build) into your documentation.
|===
include::authors.csv[]
|===
Quotes
Adding nicely formatted quotes is also easy:
//variant one

[quote, Antoine de Saint-Exupery]
____
Perfection (in design) is achieved not when there is nothing more to add, but rather when there is nothing more to take away
____

//variant two

"Code never lies, comments sometimes do."
-- Ron Jeffries
This ends up in:

Diagrams
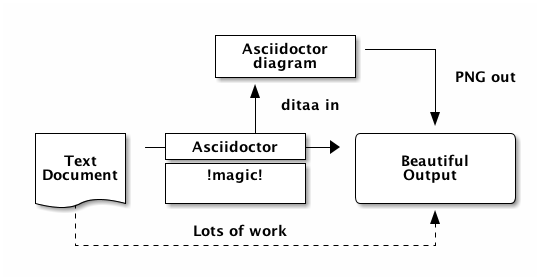
It can also render diagrams, which are written in Ascii using the asciidoctor-diagram extension.
So this:
                   +-------------+
                   | Asciidoctor |-------+
                   |   diagram   |       |
                   +-------------+       | PNG out
                       ^                 |
                       | ditaa in        |
                       |                 v
 +--------+   +--------+----+    /---------------\
 |        | --+ Asciidoctor +--> |               |
 |  Text  |   +-------------+    |   Beautiful   |
 |Document|   |   !magic!   |    |    Output     |
 |     {d}|   |             |    |               |
 +---+----+   +-------------+    \---------------/
     :                                   ^
     |          Lots of work             |
     +-----------------------------------+
gets converted to:

That allows for maintaining diagrams without the need for any additional UML tool. And, besides, you could use variables inside your diagrams, which get substituted during the build and thus are updated automatically.
Auto generated documentation
The best documentation might be the one you don’t need to write yourself and which gets updated automatically.
You can have both, when the documentation gets generated from sources which you maintain anyway.
One example for that is when you have an API using the OpenAPI Specification (fka. Swagger).
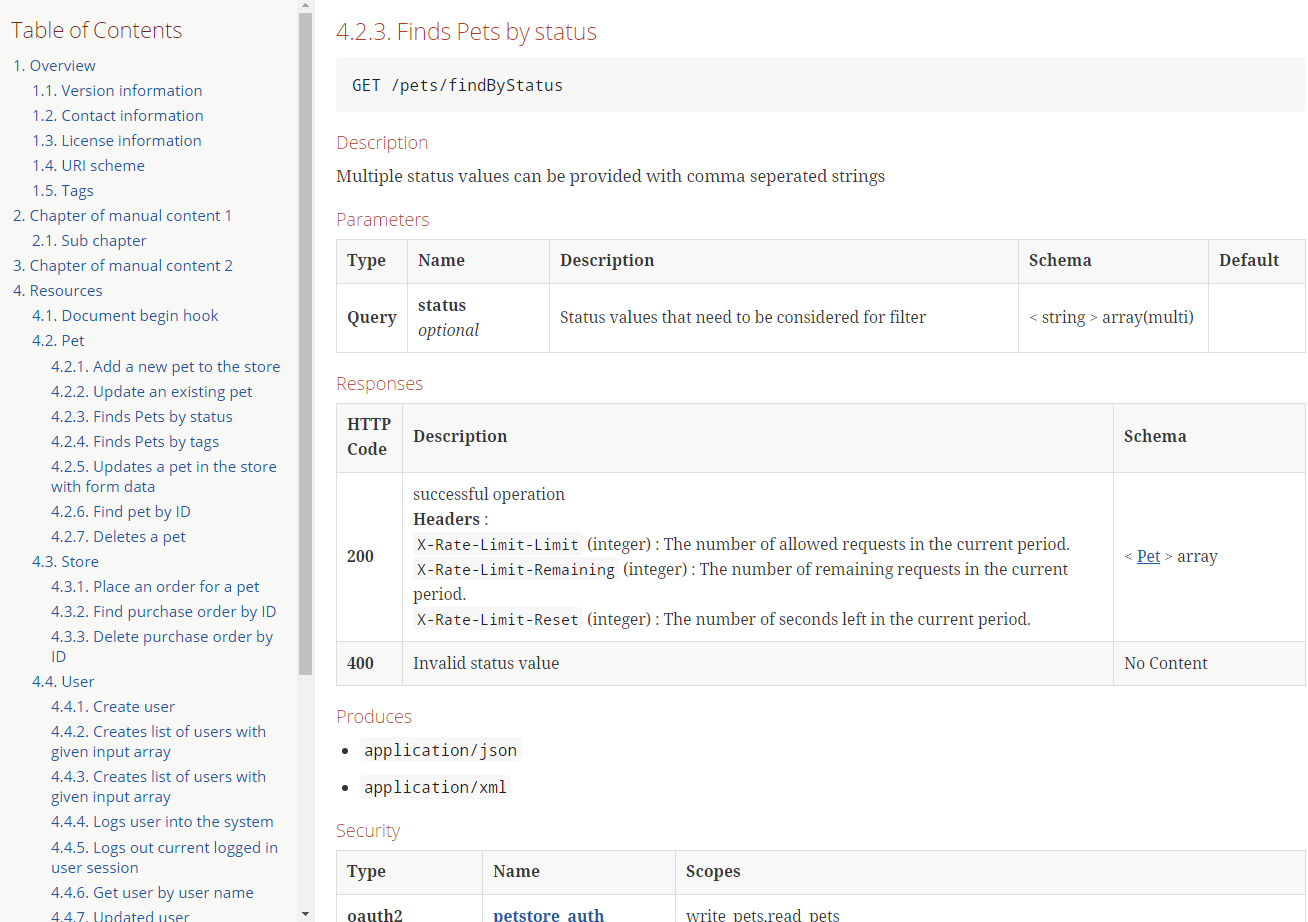
Using Swagger2Markup, a human readable documentation can be generated right from your specification.
The famous Petshop would look like this:

And lots more
The shown examples cover only a small set of the features offered by AsciiDoc. Besides, there are things like:
- Table of Contents and Table of Figures
- Bibliography
- Footnotes
- …
Multi-page documentation
Whereas you could create a one-page documentation with AsciiDoc, it is also suitable for creating large documents or even books.
In the top level page, you specify the documentation’s meta data, like its title.
Beside that, various aspects of the documentation can be configured.
= AsciiDoc Samples
// toc-title definition MUST follow document title without blank line!
:toc-title: Table of Contents
:toc: left
:toclevels: 3
:sectnums:
:sectnumlevels: 5
:imagesdir: ./images
:icons: font
:source-highlighter: coderay
Starting with the documentation’s title, a Table of Contents with three levels on the left side, having the title “Table of Contents” is configured.
Below that, we configure sections to be numbered up to five levels.
Defining the imagesdir allows us to include images across the documentation relative to that path.
Setting the icons attribute to font tells AsciiDoc to use Font Awesome icons instead of Unicode glyphs, which normally looks better.
And, finally, by specifying a source-highlighter, source highlighting for our code blocks gets enabled.
Following the configuration, we can start either adding content to the page or including other pages / chapters, using the include directive:
include::general.adoc[]

include::prerequisites.adoc[]

[...]
When dealing with larger documentation, you may want to add clickable links between different section of the documentation.
You can place anchors in your documentation using [[UNIQUE_ANCHOR_NAME]]. Those can be referenced across the documentation via <<UNIQUE_ANCHOR_NAME>> or <<UNIQUE_ANCHOR_NAME,Title of the link>>.
Using AsciiDoctor to work with AsciiDoc sources
Sources written in AsciiDoc can be converted in multiple output formats. A widespread toolset for working with AsciiDoc is AsciiDoctor. It can be used standalone or as plugins for Maven or Gradle.
AsciiDoctor also provides good reference on how AsciiDoc can be used. The Quick Reference covers the most common cases.
If you want to dive deeper, there is also a Full Guide available.
Keeping documentation together with your sources
Do you remember two of the difficulties of writing documentation? The documentation lives far away from what it is documenting and it tends to contain duplicated information, which outdates very quickly.
For both cases, AsciiDoc offers a solution. The documentation sources can reside right in the code repository. So the developers can just open and edit them directly within their IDE.
In addition, some parts of the documentation, e.g. code samples, don’t need to be duplicated but can just included into your documentation.
In AsciiDoc you can include source files from the repository like this:
[source, java]
----
include: ../src/main/java/.../SomeClass.java[]
----
That class will be rendered inline within the documentation, having proper source highlighting.
Even if you don’t want to include a full source file but only one important part of it, AsciiDoc can help.
For instance, we want to include the specific configuration of the maven-bundle-plugin, which adds the needed OSGi metada data to Java module.
In order not to include the whole pom in the documentation, we can mark the section of interest using a comment like <!-- tag::doc-service-impl-bundle-plugin-example[] --> and <!-- end::doc-service-impl-bundle-plugin-example[] --> in the sources.
A complete example looks like this:
...
<build>
    <plugins>
        <!-- tag::doc-service-impl-bundle-plugin-example[] -->
        <plugin>
            <groupId>org.apache.felix</groupId>
            <artifactId>maven-bundle-plugin</artifactId>
            <configuration>
                <instructions>
                    [...]
                </instructions>
            </configuration>
        </plugin>
        <!-- end::doc-service-impl-bundle-plugin-example[] -->
    </plugins>
</build>
...
The section between the comments can be included by specifying the corresponding tag:
[source,xml]
.pom.xml
----
include::../pom.xml[tags=doc-service-impl-bundle-plugin-example]
----
By that, the documentation gets updated automatically when you update your sources, without having any code duplication.
Release documentation together with code
A further benefit of having your documentation alongside you sources is that you can release them together.
By that we get proper versioned documentation for free. Imagine you need to maintain an older version of your application and only have the latest documentation at hand.
Having the documentation within your repository allows to browse the documentation, which fits exactly to the code version you are dealing with.
We make use of this to also have proper versioned HTML and PDF conversions of our documentation to populate a documentation server with.
When doing a release of our application, the documentation gets archived in our documentation server.
Beside the latest version, we have a tagged version of our documentation available for each release of our application. Like you are used to for e.g. JavaDoc.

Integrate AsciiDoctor in your build using Maven or Gradle
When having the documentation sources alongside your code, you would like to process those sources (e.g. converting them to HTML or PDF) the same way you process your code.
For that, there are integrations for both, Maven and Gradle, available.
Ths post will concentrate on the integration via Maven using the asciidoctor-maven-plugin.
The easiest integration, using default parameters, looks like this:
<plugins>
    <plugin>
        <groupId>org.asciidoctor</groupId>
        <artifactId>asciidoctor-maven-plugin</artifactId>
        <version>${asciidoctor.maven.plugin.version}</version>
        ...
        <executions>
            <execution>
                <id>output-html</id>
                <phase>generate-resources</phase>
                <goals>
                    <goal>process-asciidoc</goal>
                </goals>
            </execution>
        </executions>
    </plugin>
</plugins>
By default, it will pick up resources in ${basedir}/src/main/asciidoc and converts them into HTML.
Normally, we use a distinct Maven profile for running AsciiDoc. By that we can easily decide whether to run AsciiDoc. You may want to skip it in order not to affect build time.
Following example shows two executions, which convert the sources into HTML and PDF, using the corresponding backends.
For converting into PDF, asciidoctorj-pdf is used, which is defined as a plugin dependency.
<profiles>
    <profile>
        <id>build-doc</id>
        <build>
            <defaultGoal>process-resources</defaultGoal>
            <plugins>
                <plugin>
                    <groupId>org.asciidoctor</groupId>
                    <artifactId>asciidoctor-maven-plugin</artifactId>
                    <version>${asciidoctor.maven.plugin.version}</version>
                    <configuration>
                        <sourceDirectory>src/main/doc</sourceDirectory>
                        <sourceDocumentName>documentation.adoc</sourceDocumentName>
                        <outputDirectory>${project.build.directory}/doc</outputDirectory>
                        <sourceHighlighter>rouge</sourceHighlighter>
                    </configuration>
                    <dependencies>
                        <dependency>
                            <groupId>org.asciidoctor</groupId>
                            <artifactId>asciidoctorj-pdf</artifactId>
                            <version>${asciidoctorj.pdf.version}</version>
                        </dependency>
                    </dependencies>
                    <executions>
                        <execution>
                            <id>generate-html</id>
                            <phase>generate-resources</phase>
                            <goals>
                                <goal>process-asciidoc</goal>
                            </goals>
                            <configuration>
                                <backend>html5</backend>
                            </configuration>
                        </execution>
                        <execution>
                            <id>generate-pdf</id>
                            <phase>generate-resources</phase>
                            <goals>
                                <goal>process-asciidoc</goal>
                            </goals>
                            <configuration>
                                <backend>pdf</backend>
                            </configuration>
                        </execution>
                    </executions>
                </plugin>
            </plugins>
        </build>
    </profile>
</profiles>
Having that in place, you can build your documentation by invoking this profile:
mvn clean install -Pbuild-doc
Replacement for README.md
Having documentation near the code to make writing documentation easier is one thing. Another thing is to find documentation, when we need it.
Since we have the documentation sources near to what it documents, it is easily to be found by developers.
Due to its lean syntax even the sources are quite good to read for developers. Besides, there are plugins for all common IDEs, which render AsciiDoc.
And even GitHub and GitLab render AsciiDoc directly in their graphical user interfaces.
Both also recognize a README.adoc instead of a README.md and render its content as a repository’s description.
Here you can profit in two ways. First is you get a better expressiveness when using AsciiDoc (see e.g. the description of the asciidoctor-maven-plugin at Github).
Second is you can “reuse” the README.adoc in the documentation you are going to convert to HTML or PDF by just including it as shown above.
Using AsciiDoctor locally
Setup tool chain
In order to manually convert .adoc files into HTML or PDF, without using maven or gradle, you can install the needed tools locally.
The easiest way is to use RubyGems:
gem install asciidoctor
There are also alternative ways to install the tool chain.
Convert your first document
After having asciidoctor in place, you can convert any .adoc using.
asciidoctor documentation.adoc
That converts the document to HTML by default. You can specify a different output format by specifying a corresponding backend.
asciidoctor -b html5 documentation.adoc
Valid backends are html/html5, xhtml/xhtml5, docbook/docbook5, docbook45 or manpage.
There are multiple extensions for further output formats available. E.g. for PDF, EPUB3, LaTeX or Mallard.
Please refer to this page for a more detailed documentation.
Convert to PDF
To convert you documents into PDF, you first need to install the asciidoctor-pdf extension.
Again, using RubyGems is the easiest:
gem install asciidoctor-pdf --pre
In order to get proper syntax highlighting for source code samples, you have in your files, you need to install a highlighter. Rouge currently is the recommended one.
gem install rouge
Afterwards, you can convert your document by just calling
asciidoctor-pdf documentation.adoc
Please refer to that document for a more detailed documentation.
Conclusion
No matter how good the tooling, having good documentation still requires continuous effort and discipline. Just like the code itself: when it does not get maintained continuously it will start to rot.
AsciiDoc offers a nice way to keep documentation together with your code and by that lowers the burden for developers to create documentation and to prevent ending up having lots of duplicated and outdated documentation.
AsciiDoc has much less markup overhead compared to DocBook. On the other hand is offers much more expressiveness as, for instance, Markdown. It is widely supported and is about to get an open specification within the Eclipse Foundation.